31 December 2010

All I want for Christmas is... a rat?

I'm trying to teach my kids to enjoy the holiday gift-GIVING as much as the gift-receiving. So when my daughter, Margaret, announced that she wanted to make a stuffed animal for her oldest brother, Connor, I felt I couldn't say no, even though we were running out of time to make things before Christmas arrived.

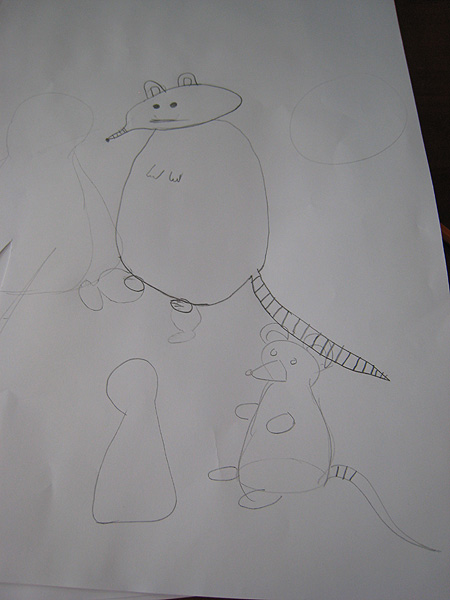
Connor was born in the Year of the Rat, and has embraced all things rat. So naturally, Margaret wanted to sew him a rat, and she made a sketch of what she thought it should look like. Her rendition looks a bit overfed, but I sketched a variation just below that I thought would work if we made it from felt, and she approved the design, "as long as there could be stripes on the tail".

I started by searching the Internet for an already-available pattern, but we found nothing that Margaret considered suitable. So, at last, I was forced to make a paper mock-up, and then deconstruct it to create a pattern that would be as similar to Margaret's concept drawing as possible.


She chose the fabrics and buttons, did most of the cutting out, and some of the hand-sewing, though pushing the needle through the felt proved to be harder on her fingers than she'd anticipated. I helped her out, trying to keep my stitches similar to hers, to preserve that made-by-a-seven-year-old look.

Although Connor is too old to play with stuffed animals, he was pleased and surprised to receive his Christmas rat, and it has a place of honour on the window sill beside his bed.

As you can see, he does, indeed, sport a great many hand-drawn stripes on his long pink tail.

02 December 2010

Snow Bear purse


I have cut-offs from several pairs of men's fleece pant legs -- the bottom 10", including the hem. As I debated what to do with them, I was inspired to make Margaret a purse for Christmas.


I flipped through the book "Fa la la la Felt", by Amanda Carestio, for some seasonal ideas, and found a photo of a Christmas stocking featuring a folk art bear surrounded by falling snowflakes. I adapted it slightly to fit the space I had on the pant leg bottom.

Using some craft store felt, I appliqued the bear and snowflakes onto the pant leg. I used the hemmed edge as the top of the purse, since it was all nicely serged. Then I sewed up the cut side of the leg to create the bottom of the purse. I made some handles out of scraps of polar fleece I had left from another project.

Finally, I made a lining for the bag using some fish print fabric -- because I figure that fish and bears go together! It was a fat quarter I'd gotten from somewhere that didn't seem to go with any other fabric I had, and I thought it would make a fun and colourful inside for the bag.

So there you go -- a little girl's purse, made out of all kinds of scrappy bits. I'm really happy with how it turned out!

15 November 2010

Doll Quilts for boys

Doll Quilts aren't just for boys, in case you were wondering. It seems that all manner of stuffed animals, including stuffed Pokemon figures, require bedclothes.

For my youngest son, a terrific Pokemon quilt resulted from a sample block I'd made years ago, and had used more recently for some free-motion quilting practice. As you can see, it features a very masculine chili pepper print on the back side. No pink or flowers or kittens to be seen!

I've been surprised at how much my boys have taken an interest in my quilts -- particularly when they are free of feminine fabrics.

31 October 2010

Spooky stitching

little witchThe last couple of weeks have been busy ones. I went to my monthly serging class last week, where I am steadily gaining comfort with my serger -- I need to work more non-quilt items into my sewing roster, so I can continue to practice and improved my serged seams.

Hallowe'en gave me an excuse to get at least a little practice, when I serged the seams of Margaret's witch costume. I purchased a McCall's pattern, from which I made a plain black cotton gown, topped with a felt cape and hat. (After so many years of piecing quilt tops with 1/4” seams, it felt incredibly wasteful to be stitching 5/8” seams!) 

witchy hatMargaret loved the process of creating a homemade costume, and was particularly intrigued by the construction of the hat. I was also able to demonstrate for her how a creative sewer can improvise when she discovers she's sewed the peak to the brim the wrong way around: I clipped away the excess felt and interfacing, and top-stitched the exposed seam, to make it look like a hat band! In these pictures, she is wielding a wand that my husband made for her on his lathe.

My eight-year-old, Scotty, also went out for Hallowe'en, but he was happy to
wear a ninja costume passed down from an older brother. The older two boys, now 13 and 14, manned the door and bequeathed bags of potato chips to our trick-or-treaters (I bought enough for 120 kids, and we ran out before the evening was over!).

spooky treat bagsTo console the teenagers for being too old to trick or treat, I made each of them a spooky loot bag, and put inside a few of their favourite treats (for Connor, Aero bars; for Quinn, sour gummies). I used an old pillowcase, cut rectangles and sewed (and serged!) the edges and top hem, then used a black permanent marker to give one a ghostly face and the other other a skeleton face. After filling them with treats, I tied each bag with a bit of white string. Super quick! -- and I'm going to tuck the empty bags away with the Hallowe'en decorations, to be reused next year.

vine pumpkinTime now to pack away the plastic skeleton and the orange jack-o-lantern lights. The carved pumpkins and hay bale on the front porch are migrating to our back garden, where the pumpkins will decompose over the winter, and the hay will make a nice mulch. Here's a last chance to admire the grapevine I carved on my pumpkin: I was psyching myself up for the grapevine applique I'm hoping to add to the border of another in-progress quilt!

Happy November, everyone!

18 October 2010

Yo-yos and pillows

megs bedHere is a picture of my daughter’s bed, which I post for two reasons. First, I want you to notice the gorgeous antique yo-yo spread. It was made by my great-aunt Helen – and she had obviously planned to make a second one, because I also have an old bag of fabric circles, completed yo-yos, and even some completed blocks. I don’t know if this spread was ever used before it came to me – I know my mother kept it shoved away in the back of a closet.
When I was a teen, I used it on my own bed. You might think it crazy to put this antique on a 7-year-old’s bed: it’s delicate old fabric! But the way I see it, she loves it and enjoys it. That’s what we make quilts for, isn’t it? I’m sure my great-aunt (who would be 112, if she were still alive) would be thrilled to know that her great-great niece was enjoying the fruits of her labours.
yo yo close up I do need to make some repairs soon: there are a few places where a yo-yo is becoming detached, and even a few yo-yos that have lost their pucker. But those fixes are easy enough to make. What I’ve struggled with over the years, is what to do with that bag of partial yo-yos down in my sewing room! After all, vintage fabric is a valuable thing. I could probably e-Bay the bag and be done with it. yo yo unravelledBecause, to tell you the truth, I don’t have much interest in making a yo-yo bed spread. The boys wouldn’t want one, and I don’t think my husband is a yo-yo guy, either.
Still, I hate to get rid of something that belonged to aunt Helen. She was like a grandmother, and sewing helps me feel connected to her. So I’m on the hunt for yo-yo ideas: something that would enable me to put them to good use.
bolster with insetIn the meantime, I wanted to show you the second thing related to Margaret’s bed: her new bolster pillow that she insisted I make for her yesterday. She saw the fabric and loved it, and I’m just too soft-hearted when it comes to fabric purchases!
I didn’t have a pattern, but it wasn’t too hard to fake one. As you can see by the inset in the photo at left, I even centred each end of the bolster on a flower – I felt very clever when I thought of that before I cut the fabric!
bear and pup are friendsMargaret is delighted with it, and already has plans for more pillows (and doll quilts) for her many, many stuffed friends.
Maybe I can find a way to turn some of those old yo-yos into throw pillows and doll blankets? Definitely an idea to sleep on!

13 October 2010

Autumn Braid table runner

runner shot 1 small

In the interest of procrastinating about my other “in progress” projects, I recently purchased a kit to make this braid runner, pattern by G.E. Designs.

I’m sure you understand – I needed this runner. It’s autumn, and I didn’t have anything appropriate to put on my kitchen table. My only other runner is a store-bought Christmas one, and it’s too early for Christmas. You see the need, right?

This was my first attempt at a quilt-as-you-go pattern, and I wished there had been a bit more instruction in it. I realized only halfway through the project runner shot 2 smallthat the quilting on the backside would have looked better if I had stitched edge to edge of the batting each time I added a piece of fabric to the braid. Instead, I only sewed the length of each fabric strip, and so the quilted pattern on the back looks a bit truncated. When I finally discovered the problem, I didn’t feel like picking it apart – I mean, who is ever going to turn the runner over? So I left it. Live and learn.

Overall, I love it. It warms up the kitchen with its gold and orange tones. I fussy-cut a couple of maple leaves and fused them to the centre block to add a personal touch.

Ultimately, I’d like to make a different runner for each month of the year. Do you have any favourite table runner patterns to recommend?

04 October 2010

Loot Bags

megs loot bag My seven-year-old daughter, Margaret, is eager to learn to sew. It’s hard to keep her out of my quilting fabrics.

I wanted to find a fairly simple, fun project for us to work on together. Then her birthday came along, and I struck on the idea of making loot bags for her party.

The usual ones she brings home from other kids’ parties are paper – or worse, plastic – that only lasts until it has been emptied. My thought was to make little fabric bags that could be used afterwards. Kids always love having something to tuck their treasures into – something that can hold Hot Wheels cars, Silly Bandz, Littlest Pet Shop pets, or a snack for the car. It could even be a sleeping bag for a Barbie doll or small stuffed animal.

Margaret’s party friends are mostly girls, so I began by purchasing some cheap and cheerful girly fabric (I wasn’t about to donate my quilting stash, thank you very much!). For each bag, she and I cut rectangles that were about 6” x 8”. I let her serge across the tops, then we put right sides together and she serged around the three sides and trimmed the threads.kyle bag

You could take an few extra minutes and turn under the top hem and stitch, for a neater edge. I did that on the two sample bags I made for Margaret and her brother. But Margaret didn’t have the patience for that, so we just went with the serged edge.

While she serged, I found some contrasting scrap fabric, and made ties. I used fabric that was about 1” x 15”, folded it in half along the length, pressed and stitched. I then found the midpoint, and tacked the tie along the seam of the bag, about 1.5” from the top edge.

We decided that her brother and her boy cousin would not care much for Sunbonnet Sue print fabric, so we made a couple of boy loot bags. For her cousin, we used some leftover construction vehicle novelty fabric, and tucked a little truck into the bag along with the other loot.

loot bags smaller picFor her brother, I cut plain red fabric (from an old pillow case) in one 6”x8” rectangle, and one 4.25”x8” rectangle. Then I sewed a 2.25”x8” scrap of paw print fabric to the smaller rectangle. Just that little bit of novelty fabric added some punch to the otherwise plain bag.

We used masking tape to label each bag with a guest’s name, and Margaret enclosed a small “Thanks for coming to my party” note in each bag. She is so excited about being able to give her friends something that she made herself!   

28 September 2010

Sampling Sashiko

IMG_1183My friend Renske, a quilt artist and teacher, invited me to join a sashiko workshop at her home. Without doubt, I already have enough projects on the go… but I’m always game for something new!

I really love the effect of the white sashiko thread against the navy fabric. So crisp and clean! Even though my stitches aren’t as tiny or as even as I would ideally like, I was pretty happy with the overall effect. After all, when you step back a bit and stop agonizing over every tiny stitch, the larger pattern emerges, and it’s quite dramatic.

IMG_1191 Showing some of her many gorgeous samples, Renske explained how even a little sashiko can be used to complement or embellish a traditional quilt – or wall hanging, table runner, quilted bag, etc. I love this one of an appliqued orchid surrounded by sashiko stitching.

I was inspired to pick up a copy of Susan Briscoe’s “The Ultimate Sashiko Sourcebook,” which contains great photos and designs. As always, there are so many possible projects, and not enough hours in the day!

I have to finish up my sampler sashiko blocks, then decide what to make them into. I do have a jelly roll of Japanese indigos hanging about in my sewing room – an obvious pairing. I just have to find a pattern or design to inspire me…  

20 September 2010

Rise and Shine

smaller wake up quilt It was time to step outside my colour comfort zone.

If you know me – if you’ve seen my stash – you know that I’m a lover of autumn colours. Deep shades of scarlet, gold, green, brown and navy are my usual inclination.

But from the first moment I saw Linda Weinstein’s “Bali Dreams” on display at the Creative Sisters Quilt Studio, I knew I wanted to make it. I was completely charmed by the cheerful rainbow of batiks.

At last, I gave in and bought the kit. The hardest part was arranging the blocks to try to get a colourwash effect. In retrospect, I wish I had substituted some of the fabrics that weren't working for me, instead of continuing to struggle with them. I arranged and rearranged the blocks on my design wall, until finally my 7 year old son said, "Mom, why don't you stop messing around and just sew them together?" Ah, from the mouths of babes!

The completed top was quilted by the Creative Sisters; I finally finished the binding at a recent quilting retreat. I still love the glowing colours: like a sunrise!